1. Targets -> Build Setting -> Combined 선택 -> Custom Flags 검색


2. Other Swift Flasgs에서 Debug 부분에  -D DEBUG 를 넣어 Flag를 추가!


3. 이러면 Swift에서도 사용 할 수 있다.

#if DEBUG

   print("debug")  

#else

   print("release")

#endif

'Swfit' 카테고리의 다른 글

xcode Launch Screen 부터 느릴때!!  (0) 2022.04.26
스위프트 개발 메모  (0) 2021.01.07
코코아팟 라이브러리 모음  (0) 2020.07.14
UIScrollView 안에 StackView넣기  (0) 2020.07.13
XCODE 시물레이터 에러 대처 간단 Tip  (0) 2020.04.03

https://www.cocoacontrols.com/

'Swfit' 카테고리의 다른 글

스위프트 개발 메모  (0) 2021.01.07
Swift DEBUG Flag 사용하기  (0) 2020.07.24
UIScrollView 안에 StackView넣기  (0) 2020.07.13
XCODE 시물레이터 에러 대처 간단 Tip  (0) 2020.04.03
swift 인디게이터 쇼/하이드  (0) 2020.04.02

1. ScrollView를 쫙쫙 벌려서 제약조건을 전부 0으로 설정한다!.

2. ScrollView 의 Content Layout Guides 를 체크 해제!!(난이렇게 함)

3. StackView 를 쫙쫙 벌려서 제약조건을 전부 0으로 설정한다!

4. StackView 컨트롤 + 드래그로 하여 ScrollView Equal Widths 선택

5. StackView 컨트롤 + 드래그로 하여 자기자신에 Equal Height 선택

6. StackView의 Height Priority 1000 -> 250 으로 변경!

7. StackView의 인스팩터(삼각자아이콘) 가서 LayoutMargins -> LanguageDirectional 선택후 전부 20으로 세팅


끝,


1. 키보드 내리기

//키보드내리기
InputMethodManager imm = (InputMethodManager) getActivity().getSystemService(Context.INPUT_METHOD_SERVICE);
imm.hideSoftInputFromWindow(et_query.getWindowToken(), 0);
//


2. 화면 리사이즈

android:windowSoftInputMode="adjustResize"


'Android' 카테고리의 다른 글

AlertDialog EditText 마진 넣기  (0) 2020.11.05
안드로이드 상태바 색상 변경  (0) 2020.10.22
안드로이드 나만의 기본 세팅!!  (0) 2020.04.06
adb shell 명령어  (0) 2020.03.29
TextView ...더보기  (0) 2020.03.29

df -h


Filesystem               Size  Used Avail Use% Mounted on

/dev/mapper/centos-root   25G  5.2G   19G  22% /

devtmpfs                 484M     0  484M   0% /dev

tmpfs                    496M     0  496M   0% /dev/shm

tmpfs                    496M   57M  440M  12% /run

tmpfs                    496M     0  496M   0% /sys/fs/cgroup

/dev/vda1                477M  148M  301M  33% /boot

tmpfs                    100M     0  100M   0% /run/user/0


size: 디스크 크기

used: 사용중인 용량

avail: 사용가능한 용량

use: 남은용량 퍼센트

'CentOS7' 카테고리의 다른 글

가상호스팅 생성  (0) 2020.04.08
리눅스 명령어  (0) 2020.03.29
1. vi /etc/httpd/conf/vhost.conf

2. 
<VirtualHost *:80>
#       ServerAdmin webmaster@dummy-host.example.com
        DocumentRoot /home/rcp
        ServerName hongslab01.cafe24.com
        ServerAlias rcp.hongslab.shop
#       ErrorLog logs/dummy-host.example.com-error_log
#       CustomLog logs/dummy-host.example.com-access_log common
</VirtualHost>
:wq 저장


3. mkdir /home/test   (DocumentRoot 경로 생성)
4. chmod -R 755 test   (읽기 쓰기 권한 부여)
5. systemctl restart httpd

6. .htaccess 파일만들기
<IfModule mod_rewrite.c>
  RewriteEngine On
  RewriteBase /
  RewriteCond $1 !^(index\.php|images|captcha|data|include|uploads|robots\.txt)
  RewriteCond %{REQUEST_FILENAME} !-f
  RewriteCond %{REQUEST_FILENAME} !-d
  RewriteRule ^(.*)$ /index.php/$1 [L]
</IfModule>


'CentOS7' 카테고리의 다른 글

centos7 남은용량 확인  (0) 2020.04.14
리눅스 명령어  (0) 2020.03.29

1. build.gradle(Project)

1
2
3
4
5
6
7
8
9
10
11
12
13
14
15
16
17
18
19
20
21
22
23
24
25
26
27
28
29
30
31
32
33
34
35
36
37
38
39
40
41
42
43
44
45
// Top-level build file where you can add configuration options common to all sub-projects/modules.
 
buildscript {
    
    repositories {
        google()
        jcenter()
        //버터나이프
        maven {
            name 'Sonatype SNAPSHOTs'
            url 'https://oss.sonatype.org/content/repositories/snapshots/'
        }
    }
    dependencies {
        classpath 'com.android.tools.build:gradle:3.6.1'
        classpath 'com.google.firebase:firebase-plugins:2.0.0'
        classpath 'com.google.gms:google-services:4.3.3'  // Google Services plugin
        // NOTE: Do not place your application dependencies here; they belong
        // in the individual module build.gradle files
    }
}
 
allprojects {
    repositories {
        google()
        jcenter()
        maven { url 'https://maven.google.com/' }
        maven { url "https://jitpack.io" }
        maven { url "https://s3.amazonaws.com/repo.commonsware.com" }
 
        //버터나이프
        maven {
            name 'Sonatype SNAPSHOTs'
            url 'https://oss.sonatype.org/content/repositories/snapshots/'
        }
 
        //adFit
//        maven { url 'http://devrepo.kakao.com:8088/nexus/content/groups/public/' }
    }
}
 
task clean(type: Delete) {
    delete rootProject.buildDir
}
 
cs


2. build.gradle(App)
1
2
3
4
5
6
7
8
9
10
11
12
13
14
15
16
17
18
19
20
21
22
23
24
25
26
27
28
29
30
31
32
33
34
35
36
37
38
39
40
41
42
43
44
45
46
47
48
49
50
51
52
53
54
55
56
57
58
59
60
61
62
63
64
65
66
67
68
69
70
71
72
73
74
75
76
77
78
79
80
81
82
83
84
85
86
87
88
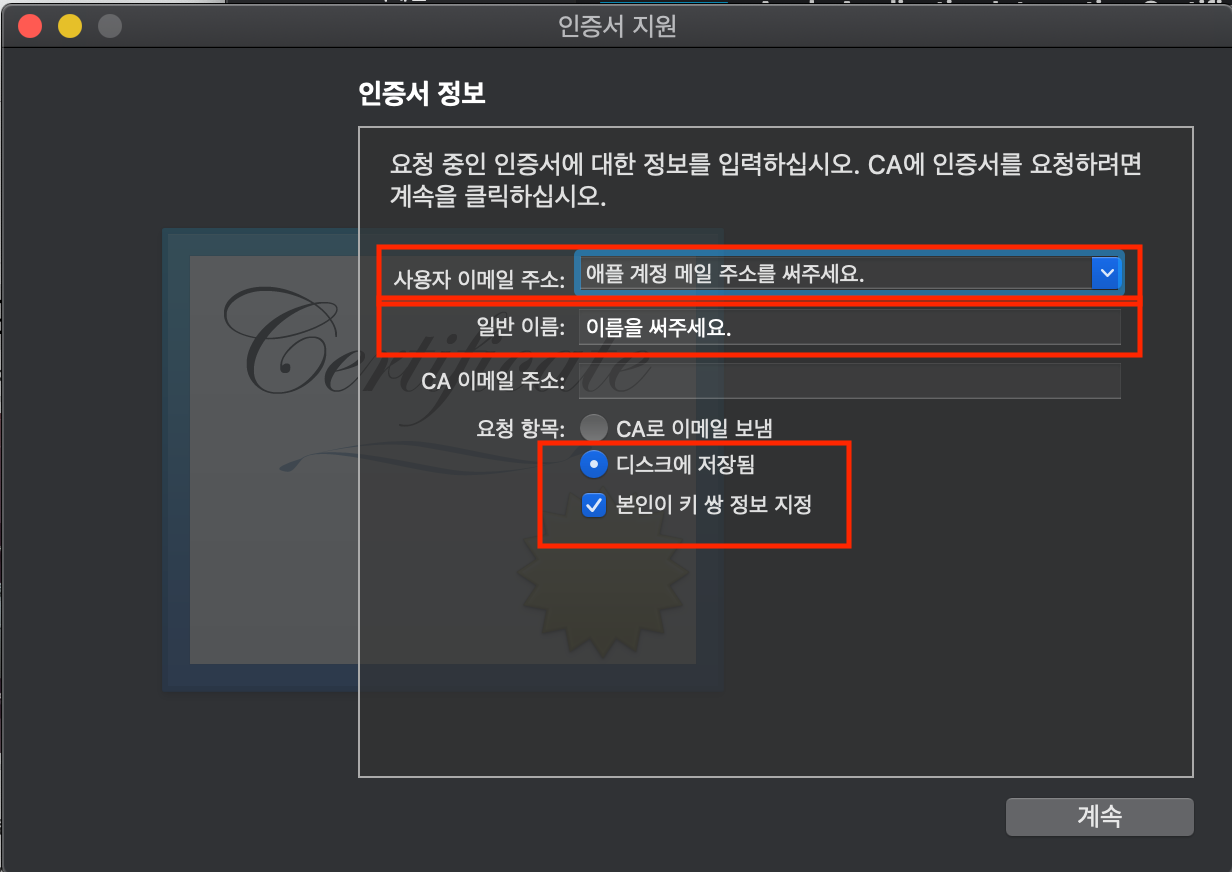
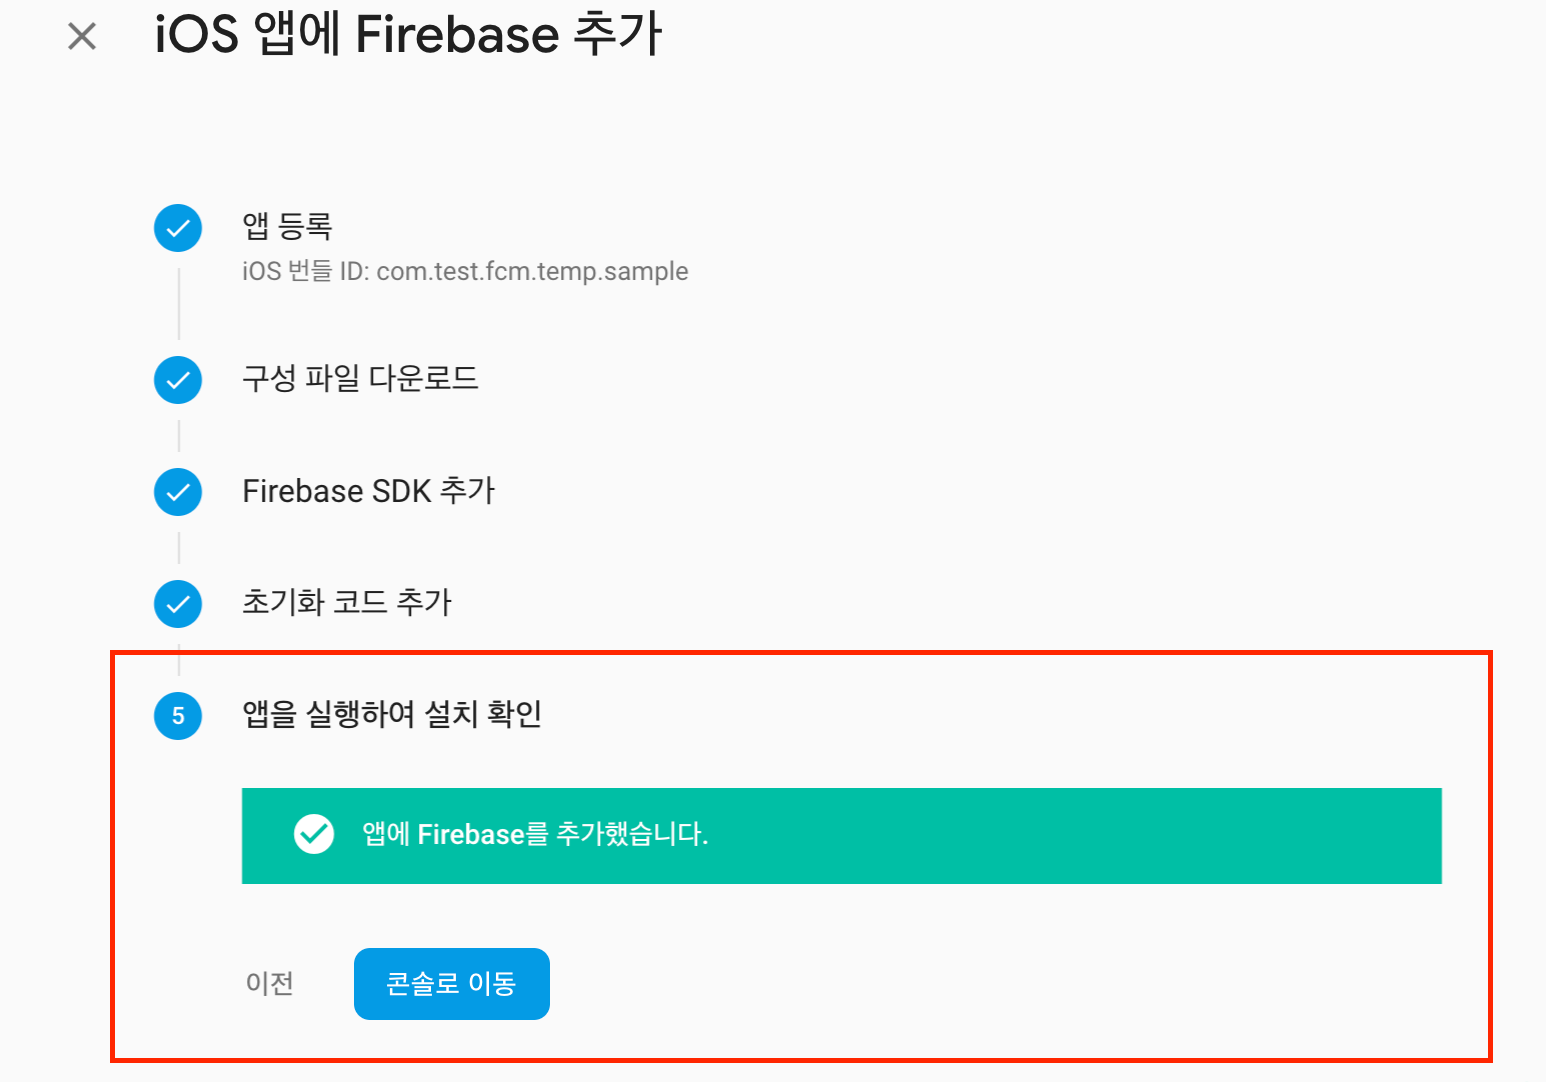
apply plugin: 'com.android.application'
 
android {
    def date = new Date()
    def formattedDate = date.format('yyMMddHHmm')
    def code = formattedDate.toInteger()
 
    compileSdkVersion 29
    buildToolsVersion "29.0.1"
 
    defaultConfig {
        applicationId ""
        minSdkVersion 23
        targetSdkVersion 29
        versionCode code
        versionName "1.2"
        multiDexEnabled true
        testInstrumentationRunner "androidx.test.runner.AndroidJUnitRunner"
    }
 
    buildTypes {
        release {
            minifyEnabled false
            shrinkResources false
            proguardFiles getDefaultProguardFile('proguard-android-optimize.txt'), 'proguard-rules.pro'
        }
        debug {
            //true 하면 속도빠르게함
            minifyEnabled false
            shrinkResources false
            //
            /*aaptOptions.cruncherEnabled = false
            ext.alwaysUpdateBuildld = false
            splits.abi.enable = false
            splits.density.enable = false
            aaptOptions.cruncherEnabled = false
            ext.alwaysUpdateBuildld = false*/
        }
    }
 
    //dexOptions 추가 : OutOfMemoryError
    dexOptions {
        jumboMode true
        javaMaxHeapSize "4g"
    }
 
    lintOptions {
        checkReleaseBuilds false
    }
 
    //버터이프 구동위해서 필요
    compileOptions {
        sourceCompatibility JavaVersion.VERSION_1_8
        targetCompatibility JavaVersion.VERSION_1_8
    }
}
 
dependencies {
    implementation fileTree(dir: 'libs', include: ['*.jar'])
 
    implementation 'androidx.appcompat:appcompat:1.1.0'
    implementation 'androidx.constraintlayout:constraintlayout:1.1.3'
    testImplementation 'junit:junit:4.12'
    androidTestImplementation 'androidx.test.ext:junit:1.1.1'
    androidTestImplementation 'androidx.test.espresso:espresso-core:3.2.0'
 
    //adFit
//    implementation "com.kakao.adfit:ads-base:3.0.12"
 
    //버터나이프
    implementation 'com.jakewharton:butterknife:10.0.0'
    annotationProcessor 'com.jakewharton:butterknife-compiler:10.0.0'
 
    //dex
    implementation 'com.android.support:multidex:1.0.3'
 
    //이미지 캐싱 로드
    implementation 'com.github.bumptech.glide:glide:4.8.0'
    implementation 'jp.wasabeef:glide-transformations:4.0.0'
    implementation 'jp.co.cyberagent.android:gpuimage:2.0.0'
 
    //material
    implementation 'com.google.android.material:material:1.1.0'
 
    //ads
    implementation 'com.google.android.gms:play-services-ads:19.0.1'
}
 
cs


3.매니패스트
1
2
3
4
5
6
7
8
9
10
11
12
13
14
15
16
17
18
19
20
21
22
23
24
25
26
27
28
29
30
31
32
33
34
35
36
37
38
39
40
41
42
43
44
45
<?xml version="1.0" encoding="utf-8"?>
<manifest xmlns:android="http://schemas.android.com/apk/res/android"
    package="">
 
    <uses-permission android:name="android.permission.INTERNET" />
    <uses-permission android:name="android.permission.SYSTEM_ALERT_WINDOW" />
    <uses-permission android:name="android.permission.GET_TASKS" />
    <uses-permission android:name="android.permission.REORDER_TASKS" />
 
    <application
        android:name=".Libs.AppInfo"
        android:usesCleartextTraffic="true"
        android:allowBackup="true"
        android:icon="@drawable/app_icon"
        android:label="@string/app_name"
        android:supportsRtl="true"
        android:theme="@style/AppTheme">
 
        <uses-library
            android:name="org.apache.http.legacy"
            android:required="false" />
 
        <meta-data
            android:name="com.google.android.gms.ads.APPLICATION_ID"
            android:value="@string/ad_id" />
 
        <service
            android:name=".Service.PlayerService"
            android:enabled="true"
            android:exported="true"
            android:permission="android.permission.SYSTEM_ALERT_WINDOW" />
 
        <activity android:name=".IntroActivity">
            <intent-filter>
                <action android:name="android.intent.action.MAIN" />
 
                <category android:name="android.intent.category.LAUNCHER" />
            </intent-filter>
        </activity>
 
        <activity android:name=".MainActivity" />
    </application>
 
</manifest>
cs


'Android' 카테고리의 다른 글

안드로이드 상태바 색상 변경  (0) 2020.10.22
안드로이드 키보드 내리기 및 화면 리사이즈  (0) 2020.04.16
adb shell 명령어  (0) 2020.03.29
TextView ...더보기  (0) 2020.03.29
이미지 슬라이더  (0) 2020.03.29

에러메시지

"This app could not be installed at this time"

대처법


XCODE로

코딩을 진행하다 보면

간단히 시물레이터가 이상한 에러를

보여줄 때가 있다.


수시로 업데이트 되는 개발도구이다 보니

버그가 존재하는 경우도 있고,

Build & Debug 과정에서

특정 리소스가 엉키는 경우도 발생한다.


최근 코딩 중에

Build는 잘 되는 상태에서

"This app could not be installed at this time"

이라는 메시지만 표출하며

Simulator에서 디버그모드 실행이

안되는 경우가 발생하였다.


Link 과정에서 File이 엉킨 상태인 것 같았는데,

다음과 같이 프로젝트를 정리하여

문제를 해결하였다.


1. 시물레이터 리셋

시물레이티 메뉴에서

Hardware -> Erase All content and settings

실행


2. XCODE 프로젝트 Clean

SHIFT + CMD + K 로

프로젝트 Clean


SHIFT + OPT + CMD + K 로

프로젝트 폴더 Clean

실행


이 두가지 방법을 실행하니

정상적으로 빌드와 디버깅이 가능하게 되었다.


결국은!!! 앱이름이 한글 이라서 그렇다!!!!

영어로 바꾸고 해보자!! 그럼 잘된다


1
2
3
4
5
6
7
8
9
10
11
12
13
14
15
16
17
18
19
20
21
22
23
24
25
26
27
28
29
30
31
32
//인디게이터 쇼
self.showSpinner(self.view)
 
//인티게이터 하이드
self.removeSpinner()


var vSpinner : UIView?
extension UIViewController {
    func showSpinner(onView : UIView) {
        let spinnerView = UIView.init(frame: onView.bounds)
//        spinnerView.backgroundColor = UIColor.init(red: 0.5, green: 0.5, blue: 0.5, alpha: 0.5)
        let ai = UIActivityIndicatorView.init(style: .large)
        ai.startAnimating()
        ai.center = spinnerView.center
        
        DispatchQueue.main.async {
            spinnerView.addSubview(ai)
            onView.addSubview(spinnerView)
        }
        
        vSpinner = spinnerView
    }
    
    func removeSpinner() {
        DispatchQueue.main.async {
            vSpinner?.removeFromSuperview()
            vSpinner = nil
        }
    }
}
cs


1
2
3
4
5
6
7
8
9
10
11
12
13
let storyboard = UIStoryboard(name: "Main", bundle: nil)
 
self.playerVC = storyboard.instantiateViewController(withIdentifier: "player"as? PlayerViewController
 
//self.playerVC.modalPresentationStyle = .overCurrentContext
 
self.view.window?.rootViewController = self.playerVC
 
self.view.window?.makeKeyAndVisible()


//스토리보드에서 Stroyboard Id 값을 player 넣어준다
cs

'Swfit' 카테고리의 다른 글

XCODE 시물레이터 에러 대처 간단 Tip  (0) 2020.04.03
swift 인디게이터 쇼/하이드  (0) 2020.04.02
ViewController 간에 데이터 전송  (0) 2020.04.01
#selector 로 액션 걸기  (0) 2020.03.31
스위프트 라이브러리 모음  (0) 2020.03.31

딜리게이트 프로토콜로 한다.!!


1. 호출하는놈

딜리게이트 연결

let destView: BYearTableViewController = segue.destination as! BYearTableViewController

destView.mDelegate = self


extension MembJoinTableViewController: BYearSelectedDelegate {

    func sendBYear(data: String) {

        uiByear.text = data

    }

}


2. 받아서 리턴 해주는놈

protocol BYearSelectedDelegate {

    func sendBYear(data: String)

}


class BYearTableViewController: UITableViewController {

    var mDelegate: BYearSelectedDelegate?


override func tableView(_ tableView: UITableView, didSelectRowAt indexPath: IndexPath) {

        let selectedYear: String = String(mYear[indexPath.row])

        print("####didSelectRowAt \(selectedYear)")


        mDelegate?.sendBYear(data: selectedYear)

        //dismiss(animated: true, completion: nil)

        self.navigationController?.popViewController(animated: true)

    }

'Swfit' 카테고리의 다른 글

swift 인디게이터 쇼/하이드  (0) 2020.04.02
swift 컨트롤러 선언후 화면 띄우기  (0) 2020.04.01
#selector 로 액션 걸기  (0) 2020.03.31
스위프트 라이브러리 모음  (0) 2020.03.31
스위프트 푸시 설정  (0) 2020.03.31
1
2
3
4
5
6
7
8
9
10
11
12
13
14
15
16
17
18
uiNickCell.addGestureRecognizer(UITapGestureRecognizer(target: self, action: #selector(nickTouch)))
 
@objc func nickTouch() {
        let inputAlert = UIAlertController(title: "알림".localized(), message: "닉네임을입력해주세요".localized(), preferredStyle: .alert)
        inputAlert.addAction(UIAlertAction(title: "확인".localized(), style: .default, handler: { (action: UIAlertAction!in
            let textField = inputAlert.textFields![0as UITextField
            if textField.text != "" {
                self.uiNick.text = textField.text
            }
        }))
        inputAlert.addAction(UIAlertAction(title: "취소".localized(), style: .cancel, handler: { (action: UIAlertAction!in
            print("Handle Cancel Logic here")
        }))
        inputAlert.addTextField { (textField) in
            textField.placeholder = "닉네임을입력해주세요".localized()
        }
        present(inputAlert, animated: true, completion: nil)
    }
cs

https://github.com/seapy/awesome/blob/master/iOS/library.md


'Swfit' 카테고리의 다른 글

ViewController 간에 데이터 전송  (0) 2020.04.01
#selector 로 액션 걸기  (0) 2020.03.31
스위프트 푸시 설정  (0) 2020.03.31
코코아팟 문세발생시 제거하고 pod 다시설치  (1) 2020.03.31
코코아팟 설치  (0) 2020.03.31

인증서가 있다면 3번부터..

1. 인증서를 요청해서 발급받기

인증서를 발급받습니다.

Mac 노트북에서 기타 -> 키체인 접근 앱을 실행 시킵니다.

그리고 왼쪽 상단 메뉴에서 ‘인증기관에서 인증서 요청…’ 을 클릭합니다.

창에서 아래 이미지의 Red BOX 부분을 확인해서 진행합니다.

그리고 저장위치 확인하고 클릭하면 파일이 저장되어있을 것 입니다.

만들어진 ‘CertificateSigningRequest.certSigningRequest’ 를 이용해서 다음을 진행할 예정입니다. (파일명은 당연히 바꾸셔도 됩니다.)

2. 인증 키를 생성해 봅시다

  • https://developer.apple.com/ -> Account -> Certificates, IDs & Profiles
  • 위 경로로 진입해서 아래 사진의 1. Key로 갑니다.
  • 그리고 2. ‘+’ 버튼을 눌러 Key 생성을 진행합니다.

APN 인증 키에 대한 설명을 입력하고,

Key Services(키 서비스)에서 APN 체크박스를 선택하고 계속을 클릭합니다.

Confirm(확인)Download(다운로드)를 차례로 클릭합니다. 키를 안전한 위치에 저장하세요.

저장한 곳은 기억하시죠?

Key ID 는 K5G3QWMRDS 이군요. (글 올리면 Revoke 할거에요~)

다운로드는 1회만 가능하며 나중에 키를 검색할 수 없습니다.

저는 잘 저장했습니다.

3.앱 ID 만들기

  • https://developer.apple.com/ -> Account -> Certificates, IDs & Profiles
  • Identifiers(식별자) > App IDs(앱 ID)로 이동합니다.
  • + 버튼을 클릭하여 새로운 앱 ID를 만듭니다.
  • FCM 셋팅을 하시는 분이시라면.. 기본적인 아이디 생성은 잘 아실 것 같군요.
  • Push Notifications(푸시 알림)가 선택 은 꼭해야됩니다.
  • Push Notifications(푸시 알림)가 선택

이제 Register, Done까지 쭉쭉하시면됩니다.

노란색 불 들어온 Configurable 은 신경 안쓰셔도 됩니다.

설정 끝나셨어요. 더 안하셔도 됩니다.

(노란색 불 들어온 Configurable 신경 안쓰셔도 됩니다..)

4. 파이어베이스에 프로젝트 등록하기

파이어 베이스 콘솔 페이지에 접속해서 프로젝트를 추가해 봅니다.

  • + 버튼을 클릭하여 새로운 프로젝트를 생성합니다.

프로젝트를 생성하였습니다.

그러면 프로젝트 메인화면으로 전환할 수 있습니다.

Spark 요금제는 무료이군요.

여기서 iOS 앱을 파이어베이스에 추가하겠습니다.

번들 ID 기억하시죠? 적어주시고.. 앱등록을 진행합니다.

그 다음에는 친절하게 구성파일 다운로드를 하라고 하는 군요.

그리고 3,4,5 단계를 진행합니다.

이제 앱을 만들어야될 것 같습니다.

5. FCM Sample App 만들기

새 프로젝트를 만듭니다.

저는 프로젝트 명을 ‘JWSFCMSample’ 으로 만들었습니다.

CocoaPods 설정을 합니다.

그리고 Bundle Identifier를 수정합니다.

구성 파일 다운로드 한 파일을 샘플 소스에 추가합니다.

샘플 프로젝트에 파일을 추가했지요.

그리고 AppDelegate.swift에 코드를 추가했습니다.

이제 빌드를 해볼까요?

앱이 성공적으로 실행이 되었습니다.

이제 console.firebase.google.com에서 마무리 못했던 5번을 확인해 보겠습니다.

앱 실행하여 설치 확인이 완료되었습니다.!!

이제 콘솔로 이동해서 마지막 단계를 진행해야겠군요.

6. Firebase 콘솔에서 테스트 메시지 보내기

개발 소스로 돌아가서..

iOS Sample Project => Capabilitles에서 Push Notification, Background Modes 설정을 해줍니다.

위의 상태가 되어야 함!!!!!


아래 링크를 바탕으로 소스도 좀 더 수정하겠습니다.

  • Podfile 도 pod ‘Firebase/Messaging’을 추가합니다. (install or update하세요)
target 'JWSFCMSample' do# Comment the next line if you're not using Swift and don't want to use dynamic frameworksuse_frameworks!# Pods for JWSFCMSamplepod 'Firebase/Core'pod 'Firebase/Messaging'end
  • 소스에서 AppDelegate.swift 파일 수정합니다. (아래 소스 링크를 참고하세요)
import UIKit
import Firebase
import FirebaseMessaging
import UserNotifications
@UIApplicationMain
class AppDelegate: UIResponder, UIApplicationDelegate {
var window: UIWindow?
func application(_ application: UIApplication, didFinishLaunchingWithOptions launchOptions: [UIApplication.LaunchOptionsKey: Any]?) -> Bool {
FirebaseApp.configure()
Messaging.messaging().delegate = self
UNUserNotificationCenter.current().delegate = self
let authOptions: UNAuthorizationOptions = [.alert, .badge, .sound]
UNUserNotificationCenter.current().requestAuthorization(options: authOptions,completionHandler: {_, _ in })
application.registerForRemoteNotifications()
return true
}
func application(_ application: UIApplication, didRegisterForRemoteNotificationsWithDeviceToken deviceToken: Data) {
Messaging.messaging().apnsToken = deviceToken
}
}
extension AppDelegate: UNUserNotificationCenterDelegate {
func userNotificationCenter(_ center: UNUserNotificationCenter, willPresent notification: UNNotification, withCompletionHandler completionHandler: @escaping (UNNotificationPresentationOptions) -> Void) {
print("\(#function)")
}
}
extension AppDelegate: MessagingDelegate {
func messaging(_ messaging: Messaging, didReceiveRegistrationToken fcmToken: String) {
print("Firebase registration token: \(fcmToken)")
let dataDict:[String: String] = ["token": fcmToken]
NotificationCenter.default.post(name: Notification.Name("FCMToken"), object: nil, userInfo: dataDict)
}
}

해당 샘플 소스는 링크는 아래와 같습니다.

(개인의 GoogleService-Info.plist 파일은 교체하셔야됩니다. 관련 정보도 바꾸셔야죠.. )

이제 앱은 받을 준비를 했습니다.

Firebase 콘솔에서 설정을 합니다.

Firebase 콘솔 -> 설정 -> 클라우드 메시징 탭 클릭.. 그리고 하단에 업로드 클릭해서 이제 전에 받아두었던 인증키의 업로드를 진행합니다.

(여기서 제가 빨간색으로 네모 테두리한 부분이 아닌 아래쪽 APN 인증서 설정은 .p12 인증서 설정이에요)

APN 인증 키 업로드 진행을 합니다.

키 ID와 팀 ID는 아래 이미지를 참고해서 완료하고 업로드 해보세요.

***팀 아이디는 Identifiers 에 있음.....***

완료 되었겠네요. 다음은 테스트 푸시를 보내봐야겠네요.

테스트 푸시 발송

Firebase -> 프로젝트 선택 -> 왼쪽메뉴의 성장 -> Cloud Message -> Send your first message 버튼을 클릭하세요.~

알림내용을 입력합니다.

알림제목과 텍스트를 입력하고, 아래 ‘기기에서 테스트’ 를 클릭합니다.

그리고 위에 iOS 소스를 핸드폰에 연결해서 실행하면 FCM Token정보값을 얻을 수 있고, 그 값을 기기에서 테스트 내용에 추가합니다.

이제 쑥쑥쑥 진행하면 됩니다.

5단계에서 검토를 누르면 발송이 완료됩니다.

완료 화면이지요.

그러면 핸드폰에서도 푸시가 왔을 것 입니다.


'Swfit' 카테고리의 다른 글

#selector 로 액션 걸기  (0) 2020.03.31
스위프트 라이브러리 모음  (0) 2020.03.31
코코아팟 문세발생시 제거하고 pod 다시설치  (1) 2020.03.31
코코아팟 설치  (0) 2020.03.31
iOS 앱스토어 스크린샷 사이즈  (0) 2020.03.29

sudo rm Podfile.lock

sudo rm -r [프로젝트명].xcworkspace 

sudo rm -r Pods 

pod install


쉽게 풀어보자면..

1. Podfile.lock 을 파인더에서 삭제.

2. 프로젝트명.xcworkspace 파일을 파인더에서 삭제

3. Pods폴더 삭제.

4 터미널 키고 pod install

'Swfit' 카테고리의 다른 글

스위프트 라이브러리 모음  (0) 2020.03.31
스위프트 푸시 설정  (0) 2020.03.31
코코아팟 설치  (0) 2020.03.31
iOS 앱스토어 스크린샷 사이즈  (0) 2020.03.29
swift 생명주기  (0) 2020.03.29

+ Recent posts